Saturday, November 4, 2017

Amazon Giveaway Test Run on Budget Balcony Living


Update:  I have received an email from Amazon. The giveaway has ended and the winner has been selected.  Congratulations to the winner!


Hi All,

I am aware that many writers, bloggers, and youtubers use Amazon Giveaways in order to advertise their books, advertise their items, or increase their audience. Some bloggers use the giveaway to thank their subscribers.

I have been considering using an Amazon Giveaway to thank my readers for awhile now. But I am concerned that I will have difficulty setting it up. People who know me are aware that I sometimes struggle with technology.

I want to set up occasional giveaways in order to give little thank yous to my readers.  Also, I write about things I really like or things that excite me. For this reason, I have wanted to find a way to share these items with others.  If I master the art of the giveaway, perhaps I will be able to regularly share some of the items I like so much.

Today is the day that I'm going to try to set up a giveaway as a small way to thank my readers and supporters.  I am choosing one of the wind chimes that I wrote about in my Neighbor-Friendly Budget Balcony Wind Chimes.

To enter this giveaway, you will need an Amazon account and a Twitter account. Go to my Twitter page and follow the directions in the giveaway tweet (which should only be to retweet the giveaway - provided I've set it up correctly). The giveaway will end on Nov. 11, 2017. Amazon will randomly choose one winner from those who have retweeted that giveaway link and Amazon will ship the item to the winner.

Should be easy-peasy. Right?

Good luck to everyone who enters! And thank you for bearing with me during this test run. Hopefully this will result in future giveaways.

To ENTER Budget Balcony Living's first Amazon Giveaway - the swimming fish wind chime by Blue Handworks - Click here and follow the instructions in the link to RETWEET.

*This article may contain affiliate links. If you shop via one of the affiliate links, I may earn a small commission - at no additional cost to you. I am very appreciative of every reader who visits my articles. Thank you. 

By the way, there are "public" Amazon Giveaways happening daily HERE.  Everyone can enter those by following the directions in the individual giveaway links. I will not be making my giveaway "public" as my intent is to focus on my readers and supporters. However, if you like giveaways... be sure to check out that link!!!!

Sunday, October 29, 2017

Neighbor-Friendly Budget Balcony Wind Chimes

Beautiful chimes by Blue Handworks
Oh how I enjoy distinctive, large, booming wind chimes. Unfortunately, apartment balcony life does Budget Balcony Living sometimes requires compromises; such as more subdued wind chime tinkling. The excellent news is that there are wind chimes that are visually beautiful while producing more subdued sounds.
not always allow for the type of wind chimes some of us enjoy most.

Beach Glass and Driftwood Wind Chimes by Blue Handworks


Blue Handworks offers a variety of wind chimes that are made of beach glass. Using beach glass as a chime is a brilliant idea as it acts as both a suncatcher and a chime. The tinkling sounds of beach glass is also less noticeable to the neighbors than the large metal tube and brass bell types of wind chimes. The beach glass pieces are hung from a piece of driftwood creating a natural piece of art.

Fortunately, Blue Handworks provides videos of their chimes so you get an idea of the sound and appearance before you make your purchase. Clearly, the exposure to wind makes a difference in how individual wind chimes sound. In the video, the wind is much stronger than I experience on my covered balcony so the sounds produced by the beach glass would be even more subdued.


Capiz Shell Wind Chimes


Capiz shells are also visually pleasing as they are translucent and allow light to pass through. The sounds the shells make are also more subdued than metal and brass wind chimes yet have a very pretty and natural tone.

Capiz shell wind chimes can be found in very small groupings with small 1" shells to very large and intricate groupings with larger Capiz shells. They are also offered in a variety of colors.

The Woodstock brand offers not only capiz shell wind chimes, but they also offer a solar-lighted capiz shell wind chime. You could combine both the sound of a wind chime and a tiny bit of light at night. Imagine what a nice touch that would be on your balcony.


Whether you are looking for your own balcony decor or a gift for someone who loves balcony living, consider these items. If your neighbors are not wind chime fans, they will thank you for refraining from hanging those large metal chimes.

*This article may contain affiliate links. If you shop via one of the affiliate links, I may earn a small commission - at no additional cost to you. I am very appreciative of every reader who visits my articles. Thank you. 

Sunday, October 8, 2017

Autumn Garland and Lights for Your Balcony

Indoor/Outdoor lighted garland
Why should seasonal decor be limited to the insides of our homes? As summer drifts into fall, and the days become shorter, it is the perfect time to decorate your balcony with autumn themed garland and lights. Bring the colors of the changing leaves to your outdoor space. Enjoy unique lights wrapped around your rails. With minimal cost and effort, your balcony can reflect the beauty of the changing seasons. A quick internet search for autumn decor shows many photos of garland used on fireplace mantels, indoor staircases, and around windows and doors. But why not bring that beauty and decoration to your outdoor space?

Simple Autumn Garlands for Balcony Rails


No fuss, no muss simple garlands can bring a touch of seasonal flair to your balcony. Choose from "silk" autumn leaves or more rustic berries and pine cones - depending on your preference or your usual balcony decor.

Rustic pine cones, felted balls & wooden leaves
Simply wrap the garland of your choice around the top rail and voila, decor that has changed wit the season. Some garland is "wired" and wraps securely around the rails. Other garland is not. Simple zip ties or floral wire can attach your garland more securely to the rails.

Lighted Autumn Leaves Garlands


I am partial to the lighted strings of autumn leaves. I like to see the colors of the leaves spotlighted by the lights or glowing with the lights hidden behind the leaves. Imagine the lighted garland in the intro photo on your rail, outside, in the dark.

If your balcony is exposed to the weather, like mine is, make sure you choose a string of lighted garland that is rated for indoor/outdoor use. And pay attention to the wording "protected outdoor use".

Autumn Light Strings


While searching for a lighted leafy garland, I found a fun variety of autumn themed strings of lights. From pumpkins, to leaves, to lights that come in shades of oranges/yellows/greens, there are several choices that celebrate the season.

You also have choices whether the lights are battery-operated or solar powered.

Whether you lean toward shaped bulbs or lights that hint at the season through the use of the color of the bulbs, there is a string of lights that reflects you and how you celebrate the change of the seasons.

*This article may contain affiliate links. If you shop via one of the affiliate links, I may earn a small commission - at no additional cost to you.  I am very appreciative of every reader who visits my articles. Thank you


Friday, June 30, 2017

Portulaca Grandiflora - Excellent Choice for the Budget Balcony

my neglected Moss Rose
One of the difficulties with growing plants in containers on a balcony or patio is trying to keep up with watering them sufficiently. Plants in containers tend to dry out more quickly so they tend to need more frequent watering. It doesn't take long for a container plant to wilt and die from lack of water. Fortunately, I have found that the Portulaca Grandiflora (Moss Rose) continues to thrive on my balcony, even when I've not watered it as I should.

What are Portulaca Grandiflora?


Portulaca Grandiflora are also called Moss Rose. In the past, I wasn't very attracted to the moss rose
plants I've seen. Then one year, I saw these amazing, white Moss Rose flowers. Since then, I've had a pot of Moss Roses on my budget balcony each summer. And each summer I've been pleased with them.

I have recently returned from a week away from my apartment, during a heatwave, and the Moss Rose continues to do well while my other plants have either wilted or nearly died. I hadn't thought of asking someone to water my plants while I was away. Drought-tolerant is only one of the good traits about the Moss Rose.

  • does well in full sun
  • tolerates heat
  • prefers desert-like conditions
  • is an "easy" care plant
  • is easy to propagate (self-seeds or from cuttings)
  • is an annual, so it does not need overwintering care
  • is inexpensive and easy-to-find

the white Moss Rose that made me fall in love

Successful Budget Balcony Gardens


While gardeners who enjoy the act of gardening, budget balcony gardens are more successful with plants that are appropriate for the conditions found on your balcony or patio. My balcony is covered, so rainfall does not benefit my plants. My balcony is exposed to direct sun for the vast majority of the day. Plants that do the best on my balcony can tolerate full sun, heat, and sometimes drought. If you explore the plants that are suited to your balcony, you too can have a successful container garden on your balcony.

A brief video I found on Youtube about Portulaca Grandiflora:


*This article may contain affiliate links. If you shop via one of the affiliate links, I may earn a small commission - at no additional cost to you.  I am very appreciative of every reader who visits my articles. Thank you


Friday, June 16, 2017

Container Potato Experiment Update

The potato plants had withered away, so I planned on digging them up  this morning.  I was not sure whether they had died from the heat wave that had gone through or whether they had died as a natural part of the life of a potato plant.  I dug them up and this what I've found. I'll share what I've learned from this budget balcony potato experiment.

In February,  I decided to plant the potatoes that I had found sprouted in my kitchen and the Budget Balcony Garden Potato Experiment began.

What I Learned from My Potato Experiment


On my budget balcony, I tend to move my plants around frequently, depending on how they seem to be responding to the amount of light they are getting. I have learned that potato plants are very brittle and can break easily.  I broke two of the plants during re-positioning of the container. In the future, I will place the container where I want it and leave it alone.

Due to these potato plants being more brittle than other plants, their tendency to hang over the edge of the tub, and my nosy dogs, I will use a tomato cage to keep my plants upright and off the floor of the balcony (and out from under the feet of my nosy dogs) during my next potato experiment.

After reading about companion plants, I planted green beans in the container also. The beans are doing great. I will plant them this way in the future. But, I will not start the potatoes in the center of the tub.  I will plant the potatoes more to one side.

Having the green beans so close to the potato plants made digging the taters a bit more difficult. But only a bit. I'll spread them further apart next time.

Other than the proximity of the bean plants, the taters were so easy to dig! Much better than my failed attempts in gardens in the yard.

In the future, I will continue to plant potatoes in containers.  I like the ease of care, lack of bugs, and had the best-looking potato harvest I've ever had.  I think with practice, it will only get better.

container garden - half taters, half beans

*This article may contain affiliate links. If you shop via one of the affiliate links, I may earn a small commission - at no additional cost to you.  I am very appreciative of every reader who visits my articles. Thank you


Sunday, March 5, 2017

Super Hummingbirds by Nature a Mesmerizing Video

Super Hummingbirds
One of my favorite things about spring is the arrival of hummingbirds. As the temperatures outside begin to warm, I have begun to wonder about putting my hummingbird feeder outside. I'm not sure how early is too early.  As I putter around this morning doing household chores, it was by sheer luck that I flipped the television channel to a public television channel as they were showing Super Hummingbirds.  If you are interested in hummingbirds, as I am, you must see this film. It is mesmerizing.

Super Hummingbirds by Nature


Through slow motion cinematography, high speed camera work, and new technology, we are able to watch some of the smallest details of the lives of hummingbirds. The movie describes and shows migration, mating, eating, nest building, and more. This is the second hummingbird film by Ann Johnson Prun, emmy award winning filmmaker. This film is so detailed that it brings us new scientific information about hummingbirds such as how they drink nectar so quickly and how the survive in high altitudes.

A male hummingbird dances in flight, flashing his brilliant feathers at a female. Trying to woo her by raising his mantel of bright purple feathers.

We watch as a hummingbird female builds a delicate nest and lay her eggs. During the PBS interveiw with the filmmaker that I'm watching, Ms.Johnson Prun reports that the egg is the size of a tic-tac. This tiny bird, in her little nest on the back of a leaf, hatches her babies.  In another nest, we watch a different species of humming bird raise her babies until they are old enough to shakily leave the nest.

The cinematography is so detailed and clear, that we are able to hear their chirps and watch these tiny hummingbirds as they hunt for and catch teeny flying insects. We watch these insects, the size of specks of dust. as the birds catches them. I could not take my eyes from the movie.

Really, I do not have sufficient words to describe how amazing this video is. How detailed it is. How we watch the rain drops land on the hummingbird and how the hummingbird shakes it off.  How brightly iridescent the feathers are and how we can see each individual feather.

I will leave you with this little video clip and encourage you to see the complete film. And I think I'll fill and hang the feeder, and see if I can attract them earlier than May, which is when I notice my first visitors each year.


*This article may contain affiliate links. If you shop via one of the affiliate links, I may earn a small commission - at no additional cost to you.  I am very appreciative of every reader who visits my articles. Thank you.

Monday, February 20, 2017

Budget Balcony Garden - Potato Experiment

I have never successfully grown a potato large enough worth the bother. Never. Not that I've tried very often throughout my lifetime. Potatoes were inexpensive where I grew up and seemed to be plentiful. As an adult, I have tried growing potatoes a few times but I will be the first to admit that my neglect was certainly what caused a lack of success with potatoes. I have decided to try again to grow potatoes. This time, I am attempting to grow a few potatoes in a container on my balcony.

Why Grow My Own Potatoes?


I love to eat potatoes. Whether they are in the form of french fries, baked, mashed, or boiled I just really like potatoes.  Approximately a year ago, I ate a potato from the grocery.  It looked a little funny but I still cut, peeled, and boiled it. And promptly became very ill.  I miss eating potatoes but I still can't bring myself to buy many from the grocery store.  So I will once again try to grow my own.

I had my most luck with growing potatoes when I tried to grow some on in a mound/tower combination. Using a tire, I piled dirt on the plant as it grew.  The plant itself did well. Then it suffered from neglect nearer to the end of it's growing season and only ended up producing tiny little taters.

It is with this mound/tower method that I am trying again.

Starting Potatoes in a Container for My Balcony Garden


I have chosen a plastic tub for my container.  I chose this particular size only because it is tall and somewhat more narrow than many storage containers.  I do not want to take up much floor space with this potato garden.

Sterilite 10 gal storage tub


On January 30th, I drilled holes in the bottom of the container for drainage using my wonderfully handy DeWalt drill. The lid is a handy drainage "saucer" for the container.  Not allowing the water to drain out of the potato containers should keep my downstairs neighbors happy.

drain holes drilled with my DeWalt


Approximately two weeks later, I cut a potato in half that had grown eyes (while forgotten in the back of my cupboard) and planted the two pieces of potato in this container.  I followed some advice on the internet stating that the seed potatoes can be planted close to the bottom of the container as the potatoes and root system grow out more than they grow down. So I placed about 3-4" of soil in the bottom of the container, placed the two sections of potatoes on that dirt and covered them with soil.

I kept the container inside until today. I kept it just inside the balcony door, allowing it to receive some light.  I placed an unused oven rack on top to keep the cat from using it as a kitty pan. After the plants had grown a couple of inches above the soil line, I covered them in more soil.

Today, February 20th, the potatoes have grown sufficiently that I've added more soil. The weather is beautiful and unseasonably warm, so I've moved them out onto the balcony. I have not placed them in the corner of the balcony that receives the most direct sun yet. I am attempting to acclimate them to the balcony.

I will be adding more soil today, but I wanted to take a photo of the growth of the plants before hiding them from view.

potato plants after less than a month


Containers for Growing Potatoes


There are many varieties of potato growing containers to choose from.  I really like the "bag" type with the access flaps that enable you to pick potatoes without disturbing the plant. If circumstances were different, I would have chosen one of the bags. I did not opt for one of those systems due to 1) my pets, 2) my own clumsiness, and 3) downstairs neighbors.  For those reasons, I opted for a hard-sided container. I am hoping to avoid accidents and spills with the container I've chosen. However, you may prefer one of the many other potato growing containers that are offered.


Intro photo design created courtesy of  FotoJet

*This article may contain affiliate links. If you shop via one of the affiliate links, I may earn a small commission - at no additional cost to you.  I am very appreciative of every reader who visits my articles. Thank you.


Sunday, February 5, 2017

Budget Balcony Garden - Growing Garlic

What do you do with that forgotten garlic you found sprouting in the cupboard? You plant it!  But only in your container garden on the balcony. Many gardeners report that it is important not to plant grocery store-bought garlic cloves in your garden due to the possibility of passing along plant disease. But they also say that you can safely plant your garlic cloves in a container on your budget balcony. This is how my garlic experiment is going so thus far.


How My Garlic Garden Experiment is Beginning


I found a sprouted garlic in my cupboard. My initial thought was to toss it into the trash. But I paused and tried to do some research and asked some gardeners online.

My concern was heirloom versus hybrid and would it be worth trying to plant. I am not a very knowledgeable gardener and before I was aware of the differences between hybrid and heirloom plants in general, I had saved some seeds from a favorite plant only to find that it didn't result in the same plant the following year. I was very disappointed.  So I didn't want to plant garlic cloves if they were going to turn out to be something other than the garlic I wanted.

It turns out that there are many conflicting opinions about planting garlic from the grocery store. Some believe that the garlic from the store is treated in a way that will not allow it to grow properly. Others show photographs of their successful garlic plants from garlic cloves from the grocery store. Many report concern about spreading disease or fungus in your garden when using garlic cloves from the grocery.

Since I would be planting these cloves in a container on my balcony, I was not concerned about spreading disease. And, since they were already sprouting, perhaps they would grow. Maybe, just maybe, I'll grow my first garlic.

January 21 - I found the sprouting garlic.  I divided the cloves and planted three cloves in a planter. I used leftover potting soil from planters on the balcony and some of the wonderful accidental compost I had made. The other cloves I placed in a small  measuring cup of water.


January 28 - two of the cloves in the planter had grown considerably. The cloves in water were also growing but not quite as tall.


February 4  -  the garlic plants in the planter range from 8" to 15" tall. The cloves in water are still doing well but are only 4" to 6" in height.


Space-Saving Planters and Balcony Gardens


Did you notice that my planter is only half of a planter?  I intentionally chose one of my old "garden wall" planters. Currently, my little garlic sprouts are on a shelf and in front of a window in my dining room. As the weather warms, I will hang my garlic plants outside - from the balcony rail. That way they are out of the way and saving space.

The following planters are similar in size to the old planter I have.


wall planters that can attach to balcony rails


Intro photo design created courtesy of  FotoJet

*This article may contain affiliate links. If you shop via one of the affiliate links, I may earn a small commission - at no additional cost to you.  I am very appreciative of every reader who visits my articles. Thank you.


Saturday, January 21, 2017

Budget Balcony Gardens - Composting

Composting is a large part of growing healthy gardens - even in the smallest gardens. That includes your balcony or patio garden. Composting is also important for the environment as you are reusing soil, leaves, food scraps, and other things that are sometimes overlooked and thrown out or left to blow away. If you create enough of your own soil through composting you will eliminate the need to purchase bags of soil from the store. Composting on your balcony can be as easy as putting old soil from your planters into a plastic container with the leaves from your spent plants and then forgetting about it.  If you think I'm joking... read on.

Set it and Forget it Composting


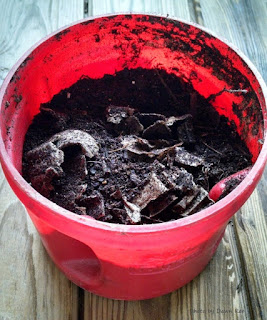
That rich, wonderful soil in the intro photograph is mine.  I literally placed some soil from a planter I was no longer using into a large coffee "can". I added egg shells, some leaves from dead plants (tomato plants if I remember correctly), ripped up cardboard containers from the plants I bought at the store, added some water, and placed it on the balcony. Initially, I turned it and shook it to mix the ingredients. But then after a short period of time, I didn't flip it, turn it, or do much else. Eventually, I brought it into a corner of the kitchen and completely forgot about it.

Today, I was looking for some soil so that I could plant a few garlic cloves as an experiment. I found this coffee can, that I had forgotten, full of this rich, wonderful soil.  I also found an old planter that held the leaves I had collected in the autumn. Those leaves were so dried out that it was easy to crush them with my hands into fine bits.  I stirred the coffee can soil and the dried leaf bits together and ended up with the prettiest potting soil I've ever seen.

I can only imagine the lovely soil I would have ended up with if I had put any effort into it.

The Best Containers for Balcony Composting


You can do as I did and use a large plastic coffee can. I chose the one I did because of the handy grips that are built-in. I did hold the lid on while I shook or turned it, as I did not want the lid flying off and decomposing bits flying all over. I had set aside a cat litter bucket with a lid and planned on using it for my composting experiment but had never gotten around to it. I wish I had used it. Can you imagine the amount of rich soil I'd have by now?

Many containers would be suitable for your apartment composting. There are small and attractive containers that can be kept on your kitchen counter for the collection of food scraps. You can use small buckets with lids, larger trash cans with lids, or plastic storage containers.  If you have a large enough balcony, or have a patio instead, there are tumbler composters as small as 37 gallons that would make turning the compost a very easy task.


What to add to Your Apartment Compost Bin


An apartment balcony garden can be tricky. The plants die off and the landlords do not want the balcony used for "storage". Because of that, every autumn I empty some of the planters and tidy up a bit. There have been years that I've thrown the dead plants into the trash. But that seems oh so wasteful. Then in the spring the potting soil looks depleted and pitiful that I purchase new potting soil. Those things were what drove me to try the coffee can compost.

You can make your own amazing soil with any of the following ingredients:

  • the soil from planters that no long have plants
  • dead plants and leaves
  • leaves you collect from the yard in the autumn
  • kitchen scraps - fruit peels, vegetable trimmings, potato peels, and more
  • egg shells
  • shredded news paper
  • cardboard (the chunks in the photo are the "cardboard" pieces discarded from the plants I had purchased at the nursery - regular cardboard decomposes more quickly)
  • DO NOT ADD meats and/or dairy scraps to your compost


I feel that it is important to note that my first attempt with the coffee can compost container was not so successful.  I had added many more egg shells and food scraps than dirt. I don't recall adding any plant matter. I had added quite a bit of water - enough that the consistency was along the lines of mud.  I did not flip it, turn it, or stir it for a bit of time (a couple of weeks if I recall correctly).  When I opened the lid, it smelled terrible! It is important to add your scraps to a sufficient amount of dirt. Composting does not require a large amount of water.

I want to add that I am clearly no composting expert.  You should read other articles about the benefits of knowing the temperature of your compost, keeping scraps in the containers on your kitchen counter, and other educational articles that would address your needs.

My intent with this was to share my excitement about the rich and beautiful soil I created. And to help you know that it can be just as easy as set it and forget it to do.  Your balcony garden plants will thank you.


Intro photo design created courtesy of  FotoJet

*This article may contain affiliate links. If you shop via one of the affiliate links, I may earn a small commission - at no additional cost to you.  I am very appreciative of every reader who visits my articles. Thank you.